SoDakStamping

SoDakStamping
Showing posts with label PSX. Show all posts

Saturday, September 15, 2012

Triple Time Technique


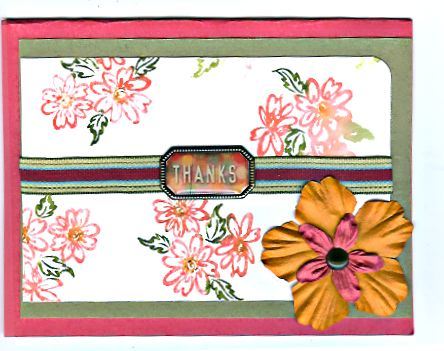
I fell in love with this elegant yet quick card.
So much so that I want to share with you how to make your own:

Triple Time Technique
Supplies:  2" by 3 1/4" panel, 3" by 4 1/4" panel, 4" by 5 1/4" panel.
Above panels will be your lighter toned papers and below are measurements for the
darker mats for each:
2 1/4" by 3 1/2" mat, 3 1/4" by 4 1/2" mat, base of 8 1/2" by 5 1/2".
The smallest combo is the 2" by 3 1/4" paired with the 2 1/4" by 3 1/2" mat.
Next is the medium 3" by 4 1/4" panel paired with the 3 1/4" by 4 1/2" mat.
Finally the 4" by 5 1/4" panel goes over the base of 8 1/2" by 5 1/2".

When you have them all cut to size sort your panels out from the mats and adhere a small
piece of low-tack double-stick tape on the backs to put the 3 panels together without the mats.
Stamp your images all over the 3 panels allowing them to "leak over".  Don't worry if  edges seem to be missing as they will be covered later.
Separate the panels and pair the small and medium with their mats, then add fibers if you want before
putting pop dots on the largest panel and adhering so images line up with each other.

I added some hand-made bakers twine as I did not have the color I wanted to use.  I wrapped some around a ruler and ran a Copic marker along it.
I used stamps by Annette Watkins, Creative Vision, Penny Black and PSX.

You could do other shapes instead of rectangles I think.

Saturday, November 20, 2010

Wood Grain Technique by TJN


The wood portion of my card is explained
fully over at Technique Junkie Newsletter.
A really nifty way to get an
authentic looking wood background
with little effort.

After matting the wood background, I
trimmed some western-looking images and added some raffia.
Stamps used are Commotion, Hero Arts and PSX.

Well, it looked kinda, sorta like a lasso to me.......

Sunday, September 26, 2010

Marker Misting

This simple card shows you the effects of misting
your stamps with water after you have
added color to those stamps with
either water-based markers or ink pads.
You can re-mist without re-inking for a "second generation" effect as well.
I used a floral stamp by PSX for my sample.

Wednesday, August 4, 2010

Cling & Scrunch Technique

This is a somewhat messy technique but it gives a wow! effect.
I dribbled some dye reinkers onto white cardstock and mixed them around a bit for full coverage.
Then I covered it with a piece of cling wrap, scrunching it here and there.
Allow to dry overnight and remove the wrap and overstamp.
That's all there is to this great background.
I stamped the little Kokopeli's by PSX in black and added some fibers
where I punched with a southwest corner punch.
I think it looks sort of HOT!!
What do you think??
I  love to read your comments you know......

Friday, December 12, 2008

Merry Christmas! (aka TJN - Holiday Blogstravaganza)


Here is a card I made using the Cuttlebug Highlights Technique from the Oct '08 issue of TJN

This is also an "economical card" in that I used a color cardstock for the base which does not open, rather the smaller overlaid white piece is the actual card itself. This enabled me to get 4 cards from one sheet of colored (more expensive) rather than only 2. This was necessary since this card is my Christmas card this year and I needed to make 50 of them.

I stamped the snowflake image several times in different blues, then ran the piece thru the Cuttlebug and ran another blue ink pad over the embossed images. This adds lots of dimension. A little ribbon, some punched flakes and it's done!

Stamps are by PSX and Endless Creations

Be sure to check out Pat's blog: The Technique Trail for more Blogstravaganza!

Tuesday, July 15, 2008

Acrylic Meets Cuttlebug II


I never did make it yesterday did I? Anywho this is another "Acrylic Meets Cuttlebug" done a little differently is all.
I slopped some dye reinkers on the backside of a piece of acrylic after I had run it through my Cuttlebug. Then I squirted some Future Floor Wax in the ink mix (or is that mess?) smushed it around with my finger until it looked interesting, let it dry and then mounted to a white panel & a yellow panel onto a red card.

Let me know via a reply post as to which one you like better....this one or the one from Sunday with alcohol reinkers & glue please. I think the floor wax/dye inks makes a much more vibrant outcome. I mounted both on white to keep them similar but now I can't decide....maybe that's why I did up a bunch more of these. This is addicting!!

Word stamp by PSX